HAProxy As A Layer 7 Load Balancer
Nachdem Sie diese Dokumentation gelesen haben wissen Sie:
- Wie Sie mehrer Applikationen unter der gleiche Domain ausführen können
Introduction
In this tutorial, we will teach you how to use HAProxy as a layer 7 load balancer to serve multiple applications from a single domain name or IP address. Load balancing can improve the performance, availability, and resilience of your environment.
Layer 7 reverse proxying and load balancing is suitable for your site if you want to have a single domain name that serves multiple applications, as the http requests can be analyzed to decide which application should receive the traffic.
This tutorial is written with WordPress and a static web site as examples, but its general concepts can be used with other applications to a similar effect.
Prerequisites
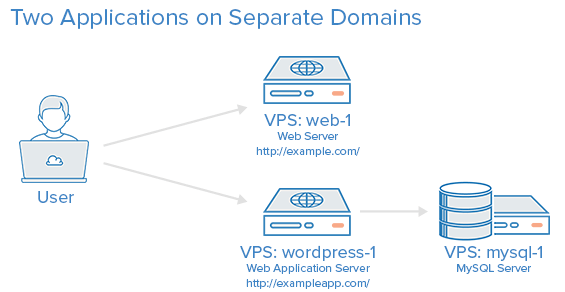
Before continuing with this tutorial, you should have at least two applications running on separate servers. We will use a static website hosted on Nginx and WordPress as our two applications. If you want to follow this tutorial exactly, here are the tutorials that we used to set up our prerequisite environment:
- wordpress-1 VPS: How To Set Up a Remote Database to Optimize Site Performance with MySQL
- web-1 VPS: How To Install Nginx on Ubuntu 14.04
Our starting environment looks like this:
In addition to your current environment, we will be creating the following VPSs:
- haproxy-www: Your HAProxy server, for load balancing and reverse proxying
- wordpress-2: Your second WordPress web application server (only required if you want to load balance the WordPress component of your environment)
- web-2: Your second Nginx web server (only required if you want to load balance the Nginx component of your environment)
If you are unfamiliar with basic load-balancing concepts or terminology, like layer 7 load balancing or backends or ACLs, here is an article that explains the basics: An Introduction to HAProxy and Load Balancing Concepts.
Our Goal
By the end of this tutorial, we want to have an environment that looks like this:
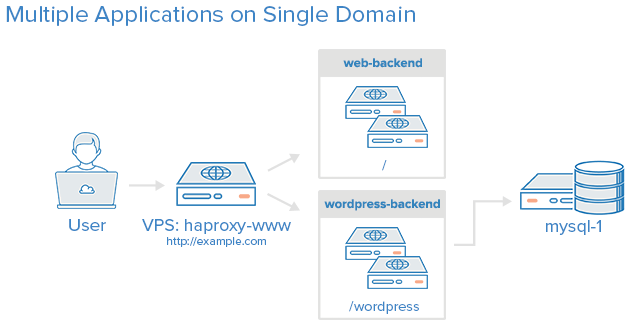
That is, your users will access both of your applications through http://example.com. All requests that begin with http://example.com/wordpress will be forwarded to your WordPress servers, and all of the other requests will be forwarded to your basic Nginx servers. Note that you do not necessarily need to load balance your applications to have them appear on a single domain, but we will cover load balancing in this tutorial.
Install HAProxy
Create a new VPS with Private Networking. For this tutorial, we will call it haproxy-www.
In our haproxy-www VPS, let’s install HAProxy with apt-get:
$ sudo apt-get update
$ sudo apt-get install haproxy
We need to enable the HAProxy init script, so HAProxy will start and stop along with your VPS.
$ sudo vi /etc/default/haproxy
Change the value of ENABLED to 1 to enable the HAProxy init script:
ENABLED=1
Save and quit. Now HAProxy will start and stop with your VPS. Also, you can now use the service command to control your HAProxy. Let’s check to see if it is running:
user@haproxy-www:/etc/init.d$  sudo service haproxy status
haproxy not running.
HAProxy Configuration
HAProxy’s configuration file is divided into two major sections:
- Global: sets process-wide parameters
- Proxies: consists of defaults, listen, frontend, and backend parameters
HAProxy Configuration: Global
All of the HAProxy configuration should be done on your HAProxy VPS, haproxy-www.
First, let’s make a copy of the default haproxy.cfg file:
$ cd /etc/haproxy; $ sudo cp haproxy.cfg haproxy.cfg.orig
Now open haproxy.cfg in a text editor:
$ sudo vi /etc/haproxy/haproxy.cfg
You will see that there are two sections already defined: global and defaults. First we will take a look at some of the default parameters.
Under defaults, look for the following lines:
mode http
option httplog
Selecting http as the mode configures HAProxy to perform layer 7, or application layer, load balancing. This means that the load balancer will look at the content of the http requests and forward it to the appropriate server based on the rules defined in the frontend. If you are unfamiliar with this concept, please read the Types of Load Balancing section in our Intro to HAProxy.
Do not close the config file yet! We will add the proxy configuration next.
HAProxy Configuration: Proxies
Frontend Configuration
The first thing we want to add is a frontend. For a basic layer 7 reverse proxying and load balancing setup, we will want to define an ACL that will be used to direct our traffic to the appropriate backend servers. There are many ACLs that can be used in HAProxy, and we will only cover one of them in this tutorial (path_beg)—for a complete list of ACLs in HAProxy, check out the official documentation: HAProxy ACLs
At the end of the file, let’s add our frontend, www. Be sure to replace haproxy_www_public_IP with the public IP of your haproxy-www VPS:
frontend www
 bind haproxy\_www\_public\_IP:80
 option http-server-close
 acl url\_wordpress path\_beg /wordpress
 use\_backend wordpress-backend if url\_wordpress
 default\_backend web-backend
Here is an explanation of what each line in the frontend config snippet above means:
- frontend www: specifies a frontend named “www”, as we will use it to handle incoming www traffic
- bind haproxywwwpublic_IP:80: replace haproxy_www_public_IP with haproxy-www’s public IP address. This tells HAProxy that this frontend will handle the incoming network traffic on this IP address and port
- option http-server-close: enables HTTP connection-close mode on the server and maintains the ability to support HTTP keep-alive and pipelining on the client. This option will allow HAProxy to process multiple client requests with a single connection, which often improves performance
- acl urlwordpress pathbeg /wordpress: specifies an ACL called url_wordpress that evaluates as true if the path of the request begins with “/wordpress”, e.g. http://example.com/wordpress/hello-world
- usebackend wordpress-backend if urlwordpress: directs any traffic that matches the url_wordpress ACL to wordpress-backend, which we will define soon
- default_backend web-backend: this specifies that any traffic that does not match a use_backend rule will be forwarded to web-backend, which we will define in the next step
Backend Configuration
After you are finished configuring the frontend, continue adding your first backend by adding the following lines. Be sure to replace the highlighted words with the appropriate values::
backend web-backend
 server web-1 web\_1\_private\_IP:80 check
Here is an explanation of what each line in the backend config snippet above means:
- backend web-backend: specifies a backend named web-backend
- server web-1 …: specifies a backend server named web-1, the private IP (which you must substitute) and port that it is listening on, 80 in this case. The check option makes the load balancer periodically perform a health check on this server
Then add the backend for your WordPress application::
backend wordpress-backend
 reqrep ^([^\\ :]**)\\ /wordpress/(.**) \\1\\ /\\2
 server wordpress-1 wordpress\_1\_private\_IP:80 check
Here is an explanation of what each line in the backend config snippet above means:
- backend wordpress-backend: specifies a backend named wordpress-backend
- reqrep …: rewrites requests for /wordpress to / when forwarding traffic to the WordPress servers. This is not necessary if the WordPress application is installed in the server root but we want it to be accessible through /wordpress on our HAProxy server
- server wordpress-1 …: specifies a backend server named wordpress-1, the private IP (which you must substitute) and port that it is listening on, 80 in this case. The check option makes the load balancer periodically perform a health check on this server
HAProxy Configuration: Stats
If you want to enable HAProxy stats, which can be useful in determining how HAProxy is handling incoming traffic, you will want to add the following into your configuration::
listen stats :1936
 stats enable
 stats scope www
 stats scope web-backend
 stats scope wordpress-backend
 stats uri /
 stats realm Haproxy\\ Statistics
 stats auth user:password
Here is an explanation of the non-trivial lines in the listen stats configuration snippet above:
- listen stats :1936: configures HAProxy’s stats page to be accessible on port 1936 (i.e. http://haproxywwwpublic_IP:1936 )
- stats scope …: collect stats on the specified frontend or backend
- stats uri /: specifies the URI of the stats page as /
- stats realm Haproxy\ Statistics: enable statistics and set authentication realm (pop-up authentication) name, used in conjunction with stats auth option
- stats auth haproxy:password: specifies authentication credentials for the stats page. Change the username and password to your own
Now save and quit. When you start HAProxy, the stats page will be available via http://haproxywwwpublic_ip:1936/ once you start your HAProxy service. HAProxy is now ready to be started, but let’s enable logging first.
Enabling HAProxy Logging
Enabling logging in HAProxy is very simple. First edit the rsyslog.conf file:
$ sudo vi /etc/rsyslog.conf
Then find the following two lines, and uncomment them to enable UDP syslog reception. It should look like the following when you are done::
$ModLoad imudp
$UDPServerRun 514
$UDPServerAddress 127.0.0.1
Now restart rsyslog to enable the new configuration:
$ sudo service rsyslog restart
HAProxy logging is is now enabled! The log file will be created at /var/log/haproxy.log once HAProxy is started.
Update WordPress Configuration
Now that your WordPress application’s URL has changed, we must update a couple of settings in WordPress.
On either WordPress server, edit your wp-config.php. It is located where you installed WordPress (in the tutorial, it was installed in /var/www/example.com but your installation may vary):
$ cd /var/www/example.com; $ sudo vi wp-config.php
Find the line near the top that says define(‘DB_NAME’, ‘wordpress’); and add the following lines above it, substituting the highlighted values,::
define(‘WP\_SITEURL’, ‘http://haproxy\_www\_public\_IP’);
define(‘WP\_HOME’, ‘http://haproxy\_www\_public\_IP’);
Save and quit. Now the WordPress URLs are configured to point to your load balancer instead of only your original WordPress server, which comes into play when you try and access the wp-admin Dashboard.
Start HAProxy
On haproxy-www, start HAProxy to make your config changes take effect:
$ sudo service haproxy restart
Reverse Proxy Complete
Now your applications are accessible through the same domain, example.com, via a layer 7 reverse proxy, but they are not yet load balanced. Your environment should look like the following diagram:
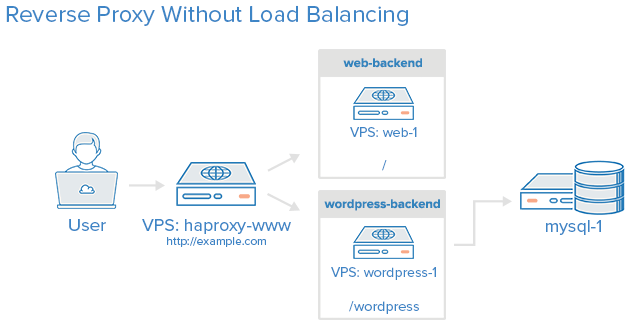
In accordance with the frontend that we defined earlier, here is a description of how HAProxy will forward your traffic:
- http://example.com/wordpress: any requests that begin with /wordpress will be sent to wordpress-backend (which consists of your wordpress-1 server)
- http://example.com/: any other requests will be sent to web-backend (which consists of your web-1 server)
If all you wanted to do was host multiple applications on a single domain, you are done! If you want to load balance your applications, you will need to read on.
How to Add Load Balancing
Load Balancing web-1
To load balance a basic web server, all you need to do is create a new web server that has identical configuration and content as your original. We will call this new server: web-2.
You have two options when creating the new VPS:
- If you have the option to create a new VPS from a snapshot of web-1, that is the simplest way to create web-2
- Create it from scratch. Install all the same software, configure it identically, then copy the contents of your Nginx server root from web-1 to web-2 using rsync (See Rsync Tutorial).
Bemerkung
Both of the aforementioned methods do a one time copy of your server root contents. If you update any of your files on one of your server nodes, web-1 or web-2, make sure you synchronize the files again.
After your identical web server has been set up, add it to the web-backend in the HAProxy configuration.
On haproxy-www, edit haproxy.cfg:
$ sudo vi /etc/haproxy/haproxy.cfg
Find the web-backend section of the configuration:
backend web-backend
 server web-1 web\_1\_private\_IP:80 check
Then add your web-2 server on the next line::
server web-2 web\_2\_private\_IP:80 check
Save and quit. Now reload HAProxy to put your change into effect:
$ sudo service haproxy reload
Now your web-backend has two servers handling all of your non-WordPress traffic! It is load balanced!
Load Balancing wordpress-1
Load balancing an application such as WordPress is slightly more complicated than load balancing a static web server because you have to worry about things like synchronizing uploaded files and additional database users.
All of the steps that are required to create an additional, identical WordPress server are described in another load balancing tutorial: How To Use HAProxy as a Layer 4 Load Balancer for WordPress. Complete the three following steps from that tutorial to create your second WordPress server, wordpress-2:
- Create Your Second Web Application Server
- Synchronize Web Application Files
- Create a New Database User
Stop once you get to the section that is called Not Yet Load Balanced.
Once you have wordpress-2 created and you have your database set up correctly, all you have to do is add it to your wordpress-backend in the HAProxy configuration.
On haproxy-www, edit haproxy.cfg:
$ sudo vi /etc/haproxy/haproxy.cfg
Find the wordpress-backend section of the configuration:
backend wordpress-backend
 server wordpress-1 wordpress\_1\_private\_IP:80 check
Then add your wordpress-2 server on the next line::
server wordpress-2 wordpress\_2\_private\_IP:80 check
Save and quit. Now reload HAProxy to put your change into effect::
$ sudo service haproxy reload
Now that you have completed this tutorial, you should be able to expand on the reverse proxying and load balancing concepts to add more applications and servers to your environment to make it fit your needs better. Remember that there are limitless ways to configure your environment, and you may need to dig into the HAProxy Configuration Manual if you have more complex requirements.